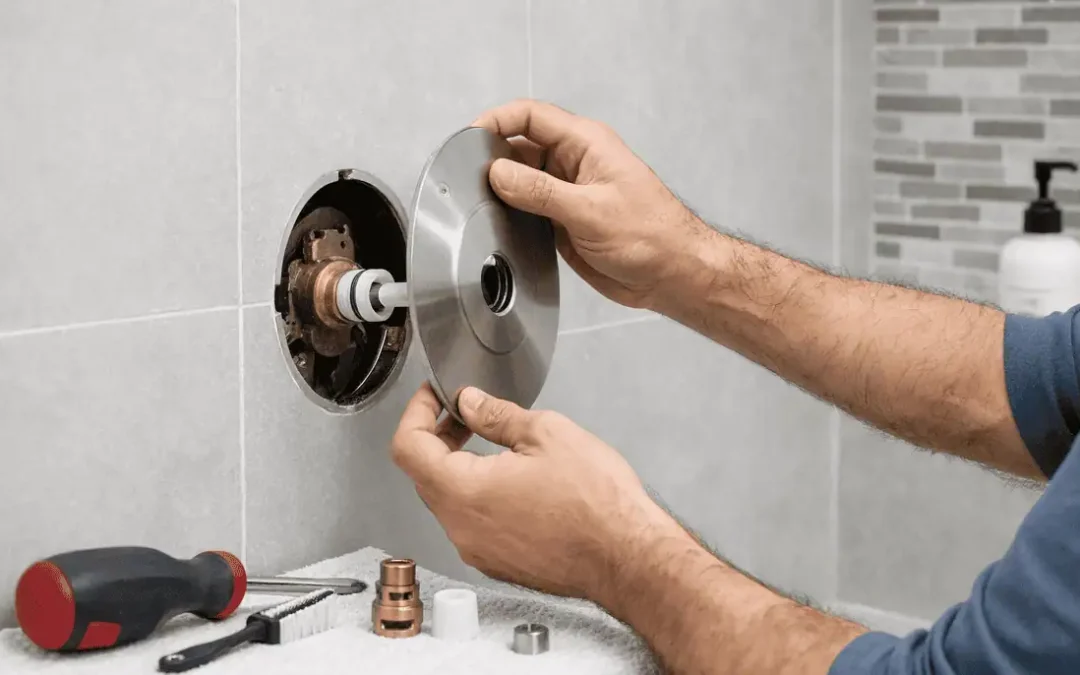
That persistent drip from your showerhead isn’t going to fix itself, and neither is a handle that suddenly demands a white-knuckle grip just to rotate. You can fix this. A leaking shower wastes hundreds of gallons of water annually, quietly inflates your utility bill, and signals that something internal is wearing out. In most modern single-handle and pressure-balancing fixtures, the source of the trouble is a degraded shower cartridge, the internal mechanism inside your control valve responsible for mixing hot and cold water and regulating flow. Replacing it is a project most homeowners can finish in a single afternoon, provided they have the right tools, the correct replacement part, and a clear understanding of where the job can go sideways.
This guide walks through every stage of the process, from diagnosing a failing cartridge to testing your work after reassembly. When the repair gets complicated: a seized cartridge, a cracked valve body, or mineral scaling that has fused the cartridge to the brass housing: the team at Lance Maxwell Plumbing, including Max Santiago and Ethan Woodard, is here day or night at (904) 209-9103 to step in before a manageable repair turns into a wall reconstruction.
Understanding Your Shower Valve and Why the Cartridge Fails
The shower control valve is the mechanical core of your shower. It sits inside the wall behind the trim plate. Every time you adjust the handle, you are moving the cartridge inside that valve, shifting a ceramic disc, a rubber-seated spool, or a plastic sleeve to blend hot and cold water at the ratio you want. The cartridge does not just control comfort; it is a safety device. It protects your family.
Plumbing standards require that individual shower and tub-shower combination control valves be equipped with pressure balance, thermostatic, or combination pressure balance/thermostatic mixing valves to provide scald and thermal shock protection, as detailed in the IAPMO Code Spotlight on shower valve requirements. The reason is simple: a sudden surge of scalding water triggers a quick reflex to get away, and on a wet, slippery shower floor, that sudden movement often leads to a nasty fall. These valves must comply with ASSE 1016 or ASME A112.18.1/CSA B125.1 standards and must feature handle position stops adjusted to limit the maximum mixed water temperature to 120°F (49°C). Keep in mind: adjusting your home’s water heater thermostat does not meet this safety rule. Dialing down your water heater is a helpful secondary step, but it is not a legal substitute for a proper mixing valve right at the shower.
Cartridges fail for several reasons. In our neck of the woods, around Jacksonville, Orange Park, and Middleburg, hard water speeds up the timeline. Mineral scaling deposits calcium and magnesium onto the cartridge’s rubber O-rings and body over time. This causes the seals to harden and crack. In worse cases, it fuses the cartridge body to the inside of the brass valve housing. That last scenario, a fully seized cartridge, is where weekend DIY repairs usually stall. Knowing the difference between a worn cartridge and a seized one before you pull things apart will save you a lot of frustration.
For a closer look at cartridge types and compatibility across different valve setups, our shower cartridge replacement resource covers brand-specific differences worth reviewing before you buy a new part.
Signs Your Shower Cartridge Needs to Be Replaced
Taking five minutes to check out the cartridge before you pull the handle apart is always time well spent. A few of these symptoms can also point to a worn seat washer or a bad O-ring elsewhere in the valve, but when two or more show up together, the cartridge is almost always the source of the trouble.
Aftermarket temperature-sensitive devices, such as specialized showerheads or aerators marketed as scald-prevention upgrades, offer some secondary protection but are not permitted as replacements for a code-required pressure balance or thermostatic mixing valve. If the mixing valve itself is failing, the cartridge needs to come out. Do not delay this.
It is also worth noting that scald and thermal shock protection rules apply specifically to standing showers. Bathtubs without a shower riser and handheld flexible showers used in a tub where you sit down are exempt, simply because the risk of slipping from a sudden reflex is not there. For a standard standing shower, a malfunctioning cartridge is a real safety concern, not just a minor annoyance.
- Persistent Leaks: Water dripping or running from the showerhead when the handle is fully in the off position.
- Difficulty Turning the Handle: The handle feels stiff, squeaks, or requires unusual force to rotate or pull out.
- Slipping Water Temperatures: Sudden blasts of freezing cold or scalding hot water when a toilet flushes or a kitchen faucet runs, which means the pressure-balancing spool inside the cartridge is stuck.
- Inability to Reach Hot Water: The water stays lukewarm regardless of handle position, often meaning the cartridge’s internal temperature limit stop is misaligned or broken.
Is your shower cartridge completely seized, or are you hesitant to risk cracking the valve body inside your wall? Do not let a minor repair turn into an expensive wall reconstruction. Contact your neighbors at Lance Maxwell Plumbing for reliable Orange Park plumbing services to handle the extraction and replacement safely.
Essential Tools and Materials for the Job
Preparation is where most DIY cartridge jobs either succeed or fall apart. Having the wrong replacement part on the counter when your home’s water is already shut off is a headache that gets old very fast.
The most common mistake is that these parts are interchangeable, but they are not. They look similar but differ. Moen, Delta, Kohler, American Standard, and Price Pfister all use proprietary designs. Even within a single brand, the cartridge varies by valve series and trim generation. You need to identify your faucet brand and model before buying anything. Check the trim plate, the handle, or any old paperwork from when the fixture was installed. If you cannot find a model number, a local plumbing supply house can often identify it from a quick photo of the valve body once you remove the trim.
For guidance on the specific tools and cartridge requirements that differ between shower and sink applications, our faucet cartridge replacement page provides a useful side-by-side reference.
The specialized tool that separates a smooth job from a cracked valve body is a cartridge puller. Standard pliers work fine on a brand-new cartridge, but older units in houses with hard water get cemented to the brass valve body by mineral deposits. Forcing a seized cartridge sideways with pliers can twist and break the copper supply lines behind the wall: a repair that quickly turns a quick cartridge swap into a full valve replacement and messy drywall work. Moen makes a brand-specific puller that threads onto the cartridge stem for a straight, controlled pull. Hex key sizes for removing handle set screws vary quite a bit across Moen, Delta, and Kohler fixtures; check your manual or the manufacturer’s website for the correct size before you begin.
During reassembly, you will also need to adjust the handle position stop to limit the maximum water temperature to 120°F (49°C) per the manufacturer’s instructions: so confirm you have the tools that procedure requires for your specific valve model.
- New Replacement Cartridge: Must match your existing faucet brand and model exactly.
- Screwdrivers: Both flathead and Phillips head for removing the handle screw and trim plate.
- Hex Keys (Allen Wrenches): To loosen the handle set screw: size varies by brand and model, so verify against your faucet manual.
- Needle-Nose Pliers: For removing the cartridge retaining clip.
- Cartridge Puller Tool: Highly recommended, especially for Moen cartridges, to extract seized units without damaging the valve body.
- Plumber’s Grease (Silicone-Based): To lubricate the new cartridge’s rubber O-rings for smooth installation and easy operation.
- Old Towels or Rags: To cover the shower drain (preventing small screws from falling in) and absorb residual water.
Step-by-Step Guide to Replacing Your Shower Cartridge
Before anything else, turn off the water supply. This is a critical step. Some shower valves have integrated shut-off ports accessible through the trim plate: small slots on either side of the valve body that accept a flathead screwdriver and close the hot and cold supply lines independently. If your valve does not have these, shut off the main water supply to the home. Once the supply is closed, open the shower handle fully to relieve the pressure and drain whatever water remains in the pipes. Cover the drain with a folded towel now, before you touch a single screw.
With the drain covered, find and remove the index cap, the decorative disc at the center of the handle, usually pried off with a flathead screwdriver. Beneath it sits the handle set screw, which you will back out with the appropriate hex key. The handle should then pull straight off, though older handles sometimes require a careful rocking motion to break free. Behind the handle you will find the trim plate, secured by screws or by friction against the wall. Remove it to expose the valve body. Depending on your fixture, there may also be a stop tube or sleeve around the cartridge stem; slide that off and set it aside with the other components.
While you have your shower disassembled, you might realize it is time for a style upgrade. If you want to replace your outdated trim, handle, and showerhead with a modern, water-efficient fixture, contact a plumber in Orange Park FL at Lance Maxwell Plumbing to handle your installation correctly.
Extracting and Installing the New Cartridge Safely
With the valve body uncovered, the actual cartridge work begins. Each step here matters: orientation errors during installation are among the most common causes of reversed hot and cold water after reassembly.
- Remove the Retaining Clip: Locate the small U-shaped brass or plastic clip at the top of the valve body. Use needle-nose pliers to grip it firmly and pull it straight upward until it clears the slot. Keep this clip somewhere safe: you need it for reassembly.
- Extract the Old Cartridge: If the cartridge moves freely, grip the stem with pliers and pull it straight out. If it is stuck, thread the brand-specific cartridge puller onto the stem, tighten the central screw until it seats firmly, and apply steady outward pressure while rotating back and forth. Patience here prevents damage: forcing it sideways risks cracking the brass valve body.
- Clean the Valve Body: Before inserting anything new, check the interior of the brass housing. A small brush and white vinegar will dissolve light mineral scaling. Any debris left behind will compromise the new cartridge’s O-ring seals and shorten its service life.
- Lubricate and Insert the New Cartridge: Apply a thin, even coat of silicone-based plumber’s grease to all rubber O-rings on the new cartridge. Align the cartridge carefully: most brands mark the hot and cold sides with an H and C indicator, or include a notch or tab that must face a specific direction (typically upward) to ensure the temperature controls work correctly. Push the cartridge straight in until it seats fully. Do not force it.
- Reinstall the Retaining Clip and Adjust the Limit Stop: Slide the retaining clip back into its slot to lock the cartridge in place. Then adjust the handle position stop according to the manufacturer’s instructions to cap the maximum mixed water temperature at 120°F (49°C). Reassemble the sleeve, trim plate, and handle in reverse order.
Turn the water supply back on slowly, not all at once, and watch the valve body for any leaks before you seat the trim plate against the wall. Once you are confident there are no leaks at the valve, turn the handle on and run the shower through its full temperature range. Hot should be hot, cold should be cold, and the showerhead should stop dripping within a few seconds of shutting the handle off. If the drip persists after a new cartridge is seated, the valve seat itself may be worn, or the O-rings may not have seated properly during installation. Our troubleshoot a dripping shower guide covers those follow-on diagnostic steps in detail.
Step 1: Turn Off the Water Supply
The first and most important step is turning off the water supply. Some showers have a local shutoff valve located behind the trim plate, but many homes require shutting off water to the entire house. Once the water is off, turn the shower handle to release any remaining pressure in the line. This helps reduce water spills when the valve is opened. Place towels around the shower area to catch any water that may drip during the repair. Skipping this step can quickly turn a cartridge replacement into an indoor water feature, and not the kind anyone asked for.
After shutting off the water, confirm that no water flows from the showerhead. If water continues running, the shutoff may not be fully closed, or there may be another issue with the plumbing system. Do not remove the cartridge until you are certain the water is off. Working on a pressurized valve can cause water to spray out suddenly and may damage the valve or the surrounding wall. If you cannot locate the shutoff or the valve does not stop the water completely, it is time to call a professional. At Lance Maxwell Plumbing, we can safely handle shutoff issues and cartridge replacements throughout Jacksonville and Orange Park.
Step 2: Remove the Shower Handle and Trim
Once the water is off, remove the shower handle. Many handles have a small set screw located underneath or on the side, often requiring an Allen wrench. Other handles may have a visible screw hidden behind a decorative cap. Carefully remove the screw and pull the handle away from the wall. If the handle is stuck due to mineral buildup, avoid forcing it too aggressively. Gentle movement and patience can help prevent damage to the handle or valve stem.
Next, remove the trim plate or escutcheon. This plate covers the valve opening and gives the shower a finished look. Some trim plates are held in place with screws, while others may be sealed with caulk. If caulk is present, carefully cut around the edge before pulling the plate away from the wall. Once removed, you should be able to see the valve body and cartridge assembly. Keep all screws and parts in order, so reinstallation is simple.
Step 3: Identify the Retaining Clip or Nut
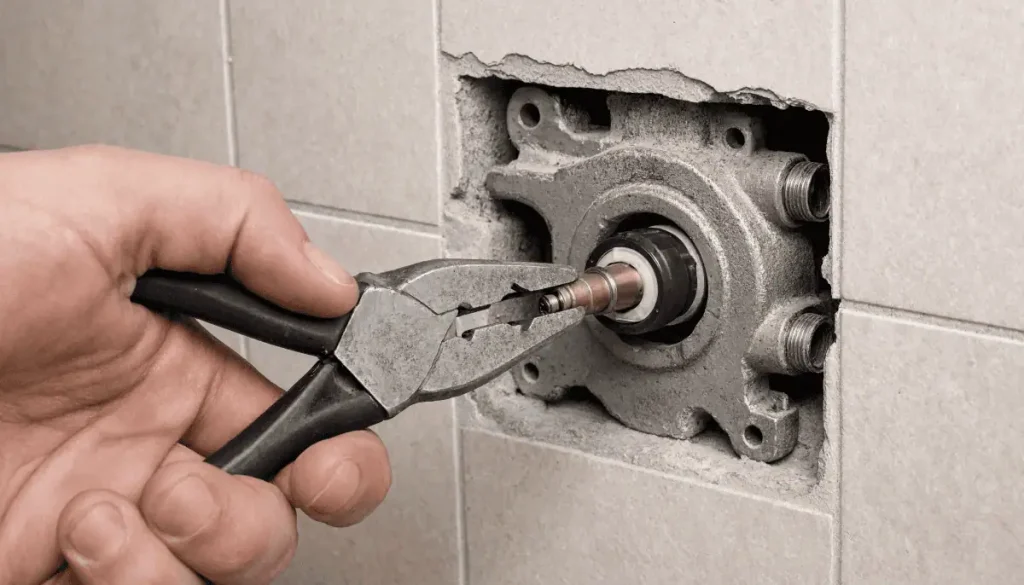
Most cartridges are held in place by a retaining clip, retaining nut, or similar fastener. This part keeps the cartridge secure inside the valve body. Use a flashlight to inspect the valve and determine how the cartridge is held in place. If there is a retaining clip, use needle-nose pliers to pull it straight out. If there is a retaining nut, use an adjustable wrench to loosen it carefully. Avoid bending, breaking, or losing these parts, since they are necessary for proper reassembly.
This step is also a good time to inspect the area for corrosion or mineral buildup. In older homes or areas with hard water, the cartridge may be difficult to remove. If the retaining clip or nut appears severely corroded, forcing it can damage the valve body. A damaged valve body may require a more involved repair behind the wall. That is one reason professional help can be valuable, especially when the shower valve has not been serviced in many years. Sometimes the most affordable repair is the one that avoids turning a small job into a bigger one.
Step 4: Remove the Old Cartridge
After removing the retaining clip or nut, pull the cartridge straight out from the valve body. Some cartridges come out easily with pliers, while others require a cartridge puller. If using pliers, grip the cartridge stem gently but firmly and pull straight outward. Avoid twisting too hard unless the manufacturer’s instructions allow it, because excessive force can damage the valve. If the cartridge is stuck, do not pry against the shower wall or valve body. This is where patience matters, because the cartridge may be held in place by years of mineral buildup.
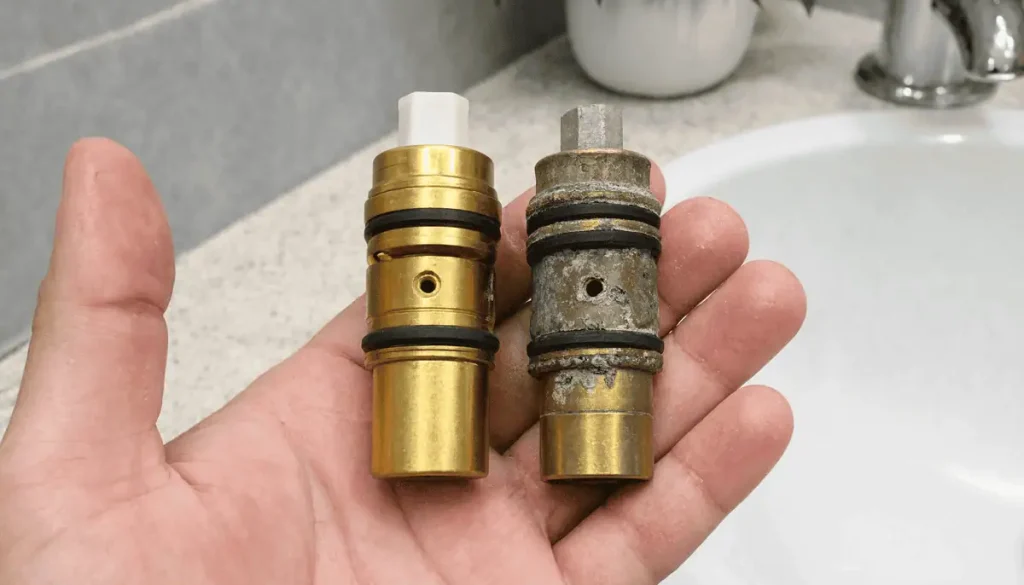
Once the cartridge is removed, inspect it carefully. You may see worn rubber seals, cracks, corrosion, or sediment buildup. Take note of the cartridge orientation before discarding it. Many cartridges must be installed in the correct position to ensure that hot and cold water work properly. If the new cartridge is installed backward, your hot and cold sides may be reversed. That is not dangerous in every case, but it is definitely not ideal when someone expects warm water and gets a chilly surprise.
Step 5: Prepare and Install the New Cartridge
Before installing the new cartridge, clean the inside of the valve body with a clean rag. Remove visible debris, mineral deposits, or old rubber fragments. Do not use harsh tools that could scratch the valve interior. Apply a small amount of plumber’s grease to the rubber seals on the new cartridge, unless the manufacturer’s instructions say otherwise. This helps the cartridge slide into place and can make future removal easier. Make sure the new cartridge matches the old one exactly before installation.
Insert the new cartridge in the same orientation as the old cartridge. Push it straight into the valve body until it is fully seated. Reinstall the retaining clip or nut to secure it in place. The cartridge should not wobble or move loosely once secured. If the retaining clip does not slide back into place, the cartridge may not be fully seated. Do not force the trim or handle back on until the cartridge is properly installed.
Step 6: Reassemble the Shower and Test It
After the cartridge is installed, reattach the trim plate and handle. Make sure the handle is aligned correctly and moves smoothly. Turn the water supply back on slowly and check for leaks around the valve and showerhead. Test both hot and cold water to confirm the temperature adjustment works properly. Let the shower run for a short time to flush out any trapped air or loose debris. If everything works as expected, the repair is complete.
If the shower still drips, the handle feels wrong, or the temperature does not adjust correctly, there may be another issue. The cartridge may not be seated properly, the valve body may be damaged, or the replacement part may not be the correct model. Some pressure-balancing valves also require additional adjustment after cartridge replacement. If you notice leaking behind the trim plate, turn off the water and call a plumber right away. Water behind the wall can lead to damage if it is not addressed quickly. Our team at Lance Maxwell Plumbing can diagnose the problem and provide the right repair.
Frequently Asked Questions About Shower Cartridge Replacement
How do I know if my shower cartridge is bad?
The most reliable signs are a showerhead that drips when the handle is fully off, a handle that has become stiff or squeaky to rotate, and temperature instability: either an inability to reach hot water or wild swings between scalding and freezing cold when other fixtures are running. Any one of these can occasionally have another cause, but two or more appearing together almost always points to the cartridge.
Do I need to shut the water off to change a shower cartridge?
Yes, you must shut the water off without exception. The water supply must be closed, either through the integrated shut-off ports on the valve body or via the home’s main shut-off, before you remove the retaining clip. Pulling the clip with the supply open releases pressurized water directly from the valve body, which will flood the bathroom immediately. There is no workaround for this step.
Do you need a plumber to replace a shower cartridge?
No, you do not necessarily need a professional. You can do it. Many homeowners complete this repair successfully with basic tools and the manufacturer’s installation instructions. That said, a completely seized cartridge, the absence of a brand-specific puller, or uncertainty about working inside the wall are all legitimate reasons to bring in a professional. The cost of a professional cartridge replacement is low compared to what a cracked valve body or a damaged supply line can escalate into. There is no clean answer to how far a seized cartridge will resist before something else gives.
What is the lifespan of a shower cartridge?
Most residential shower cartridges are generally estimated to last somewhere between 10 and 20 years under normal conditions, though that range is a rough guideline rather than a manufacturer guarantee. In areas with hard water, such as Jacksonville, Orange Park, and much of Clay and Duval County, mineral scaling can shorten that window considerably, causing cartridges to stiffen, leak, or seize years ahead of schedule.
How much should a plumber charge to replace a shower cartridge?
Professional cartridge replacement typically runs somewhere in the range of $150 to $350, depending on the faucet model’s complexity, local labor rates, and whether you supply the replacement part yourself. That figure can climb substantially if the cartridge extraction damages the valve body and requires a full valve replacement: a repair that may also involve opening the wall. The cost gap between a straightforward cartridge swap and a valve body replacement is significant enough that using the right extraction tools, or calling a professional before forcing a seized cartridge, is almost always the more economical path.
How do I know what shower cartridge I need?
The best way is to identify the brand and model of your shower valve. Look for markings on the trim, handle, or old cartridge. If you are unsure, take the old cartridge to a plumbing supply store or call a professional plumber for help.
Can I replace a shower cartridge myself?
Yes, many homeowners can replace a shower cartridge with basic tools and the correct part. However, the job can become difficult if the cartridge is stuck, the valve is corroded, or the water supply cannot be fully shut off.
Why is my shower still leaking after replacing the cartridge?
The new cartridge may not be seated correctly, the wrong cartridge may have been installed, or the valve body may be damaged. In some cases, debris inside the valve can also prevent a proper seal.
How long does a shower cartridge last?
A shower cartridge can last several years, but its lifespan depends on water quality, usage, and the condition of the plumbing system. Hard water and mineral buildup can cause cartridges to wear out faster.
Do I need to turn off the water before replacing a shower cartridge?
Yes, the water supply must be turned off before removing the cartridge. Failing to do so can cause water to spray from the valve and may lead to damage.
What happens if I install the cartridge backward?
In many cases, hot and cold water may be reversed. Some cartridges are designed with a specific orientation, so always follow the manufacturer’s instructions or match the position of the old cartridge.
Is a dripping shower always caused by a bad cartridge?
Not always, but a worn cartridge is one of the most common causes. Other possible causes include a damaged valve seat, worn seals, high water pressure, or issues elsewhere in the plumbing system.
Replacing a shower cartridge resolves the most common shower complaints, including persistent leaks, sluggish handles, and erratic temperatures, and restores the scald protection that a functioning pressure-balance or thermostatic mixing valve is required to provide. Most homeowners who approach the job step by step, with the correct replacement part and a cartridge puller on hand, finish without complications. When the cartridge is seized, when the valve body shows damage, or when the repair uncovers a leak behind the wall, calling a professional is the right call, not a failure. We are here to help.
At Lance Maxwell Plumbing, Max Santiago, Ethan Woodard, and the rest of the team serve Orange Park, Jacksonville, Middleburg, Fleming Island, and the surrounding communities day or night. Customers who have worked with them describe the experience plainly:
“Max Santiago came out and was very professional and fixed our problem.both him and his helper were polite and to the point! I would highly recommend Lance Maxwell Plumbing !” – Karen Hall
“Had Ethan Woodard come out to my property today service some basic plumbing repairs and he taught me how to fix the issues myself in the future as well as not overcharging me for additional stuff that I didn’t need . Great Service will use again” – Rick Creel
“The guys came out today and did a fantastic job clearing out my clogged washer drain, highly recommend LM for your plumbing service needs!” – John Spahni
Tried to replace your shower cartridge but still dealing with a dripping showerhead? Or did you discover a leak behind the wall during disassembly? Do not leave your home’s water shut off for hours. Contact Lance Maxwell Plumbing today at (904) 209-9103 for rapid-response plumbing services in Fleming Island and throughout Clay and Duval counties to get your shower working perfectly again.
When Should You Call a Professional Plumber?
Replacing a shower cartridge can be a good DIY project for someone who is comfortable working with basic plumbing parts. However, not every cartridge replacement is simple. If the cartridge is stuck, the valve is corroded, the shutoff valve will not work, or you are unsure which replacement part to use, calling a professional is the safer choice. A plumber can also identify whether the cartridge is truly the problem or whether another part of the shower valve needs attention. This can save time and prevent unnecessary damage. Plumbing repairs are often easiest when handled before frustration takes over.
You should consider calling a plumber if:
- You cannot shut off the water completely
- The cartridge is stuck inside the valve
- The retaining clip or nut is corroded
- You are unsure of the cartridge brand or model
- Water is leaking behind the wall
- The shower still leaks after replacement
- The valve body appears damaged
- You are replacing parts in an older plumbing system
At Lance Maxwell Plumbing, we have more than 31 years of experience providing plumbing installation and repair services in the Jacksonville and Orange Park areas. We work with high-quality plumbing products from trusted brands like Delta, Kohler, and Moen. Whether your shower needs a simple cartridge replacement or a more complete valve repair, our friendly and knowledgeable team can help. We understand that plumbing problems do not always happen during convenient business hours. That is why our on-call 24/7 availability gives customers peace of mind, day or night.
Call Lance Maxwell Plumbing Today
If your shower is leaking, difficult to control, or giving you more surprises than your morning coffee should, we are ready to help. As your trusted Jacksonville plumber, we proudly serve the Jacksonville and Orange Park areas with plumbing installation, repair, water heater installation, new construction plumbing, preventive maintenance, and more. With more than 31 years of experience, our friendly and knowledgeable staff will do whatever it takes to ensure every customer’s needs are met. We also offer high-quality plumbing products from respected brands like Delta, Kohler, and Moen, so you can feel confident in the parts and service you receive. With our on-call 24/7 availability, you can rest assured that our team will be there to resolve your plumbing issues, day or night. Contact us today, and one of our representatives will be glad to assist you in addressing your plumbing needs.